Tired of grainy videos ruining your viewing experience? Whether it’s home recordings, professional clips, or online content, a noisy or grainy video can be frustrating.
But don’t worry—there’s hope! With the right tools and techniques, you can fix grainy videos on your PC without losing their quality.
In this comprehensive guide, we’ll explore different methods on how to fix grainy videos without losing quality on PC. Let’s keep exploring!
Common Reasons for Your Grainy Videos
There are several reasons why your videos become grainy while playing.
Understanding the exact cause will help you determine the adequate video repair methods without sacrificing their original quality. Some main reasons include:
- Insufficient Lighting – Ensure your videos are filmed in good lighting. If you are using dim or little indirect light to film, it can often lead to excess noise.
- High ISO Settings – When the ISO setting on the camera is increased, ambient light is made to look brighter. You will likely also see excess noise in the footage.
- Compression Issues – Video files compressed at low bitrates can lose detail, causing grainy or pixelated visuals.
- Old or Poor-Quality Cameras – Shooting your videos with a decades-old camera can seriously decrease detail and increase graininess due to low low-quality sensor.
- Zooming – Applying digital zoom rather than optical zoom can worsen video quality and introduce graininess.
Quick Methods to Fix Grainy Videos Without Losing Quality on PC
Now that you are familiar with the reasons for your grainy video files, it’s time to proceed with quick video repair workarounds.
In this part of the article, we’ve highlighted different video repair fixes that you can try to repair your damaged video files without losing their quality:
Method 01: Try Using Noise Reduction Software
Let’s begin with the simplest and direct approach. There are several noise reduction software tools available online that you can try to clean up video footage.
These tools use advanced algorithms to remove noise and grain while preserving sharpness. Here are some options that you can try:
- Adobe Premiere Pro (with Neat Video plugin): It is a professional video editing software which you can pair with Neat Video, a powerful noise reduction plugin. This will help you to reduce graininess in your video without impacting its overall quality.
- DaVinci Resolve: It is a free professional video editor which offers powerful noise reduction during colour grading, allowing precise control to clean grain while preserving video detail and colour accuracy.
- Topaz Video AI: This cutting-edge software leverages advanced machine learning algorithms to intelligently analyse each frame, effectively reducing noise and grain while enhancing details and sharpness.
Here’s how you can use Premiere Pro with Neat Video for noise reduction in your video files:
- Firstly, import your grainy videos into Premiere Pro.
- Try applying the Neat Video effect on your video clip.
- Now, open Neat Video’s interface and create a noise profile by sampling a flat, grainy area in your video.
- Adjust the strength and smoothing parameters to reduce grain while preserving details.
- Once done, save the changes and check if these steps help in improving the video quality.
Noise reduction software is the best option and helps you in repairing your videos quickly and effectively, especially when you want to keep the original resolution and quality intact.
Method 02: Adjust Video Settings in Editing Software
Sometimes adjusting video configurations like its brightness, contrast, or clarity features can help you minimize the graininess in your video file. For this:
Steps to Try:
- Adjust Brightness & Contrast: Slightly increase brightness and contrast in your video to make grain less noticeable.
- Sharpening: Moderate sharpening of your video files helps in retaining detail, but over-sharpening can exaggerate noise.
To adjust these settings in your video:
- Firstly, open the video file in a video editor like Adobe Premiere Pro, DaVinci Resolve, etc. You can even open your video in free tools like Shotcut or HitFilm Express.
- Locate the Brightness/Contrast filter and apply it to your video file.
- Increase brightness carefully to avoid washing out the image.
- Adjust contrast to deepen shadows and highlight details.
- Also, add slight sharpening to improve clarity without affecting noise.
Note: This method may not help you eliminate grain, but it can make your video less distracting.
Method 03: Fix Grainy Videos Using Video Repair Software
If the above methods to fix grainy videos without losing quality on PC seem difficult or fail, then third-party video repair software can help you.
Tools like Stellar Repair for Video are an effective option to repair grainy or pixelated video files easily.
This all-in-one video repair software can help you repair videos that appear grainy due to poor lighting conditions during recording, high ISO settings on cameras, compression, or any other reason.
Why Choose Stellar Video Repair Tool?
Here are some key features which make Stellar the perfect choice for your video repair:
- User-friendly interface suitable for beginners.
- Supports multiple formats, including MP4, MOV, AVI, MKV, etc.
- Repairs severe corruption with the Advanced Repair feature.
- Ensures safe and secure repair without altering the original file.
- Allows you to preview the repaired file before saving it on your device.
Here’s how to fix grainy videos without losing quality on PC using the Stellar Repair for Video tool
Step 1: Firstly, download and install the Stellar Repair for Video software from the official website on your Windows or Mac system.
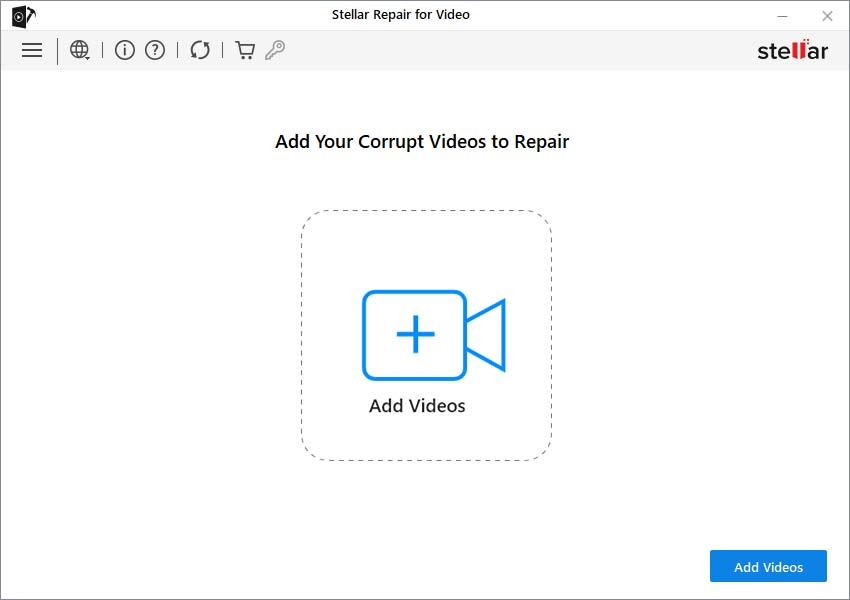
Step 2: Launch the software and click Add Videos button from the homepage to upload one or multiple grainy or damaged video files that you need to repair.
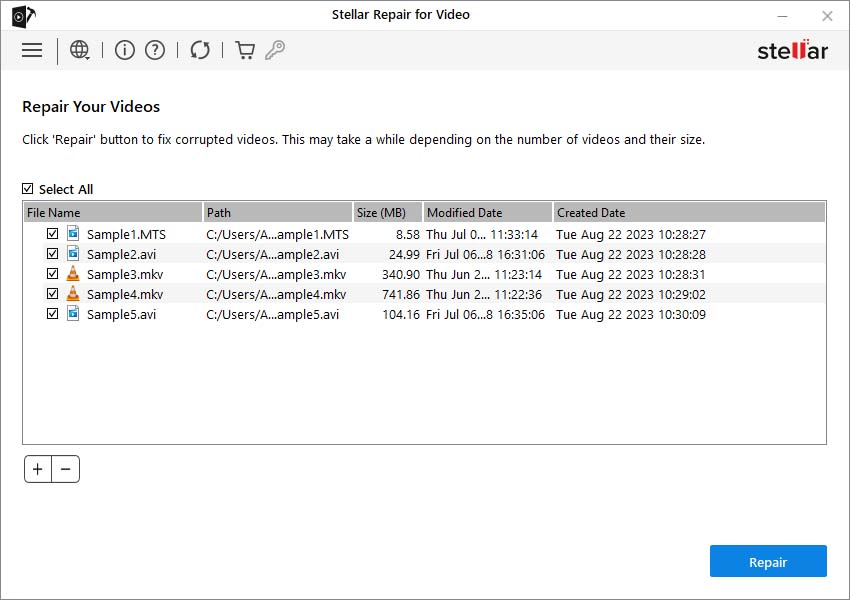
Step 3: After uploading the files, click Repair to initiate the repair process. The software automatically scans and fixes common video issues like graininess, corruption, or playback errors.
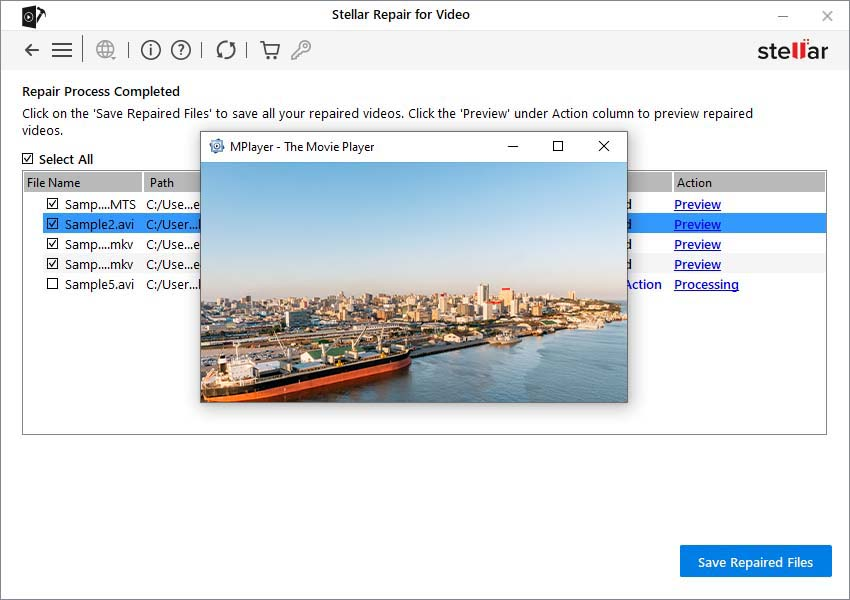
Step 4: Once the repair is complete, preview the repaired video files and click Save Repaired Files to save the repaired videos to the desired location.
Additional Tips to Avoid Grainy Videos in the Future
While fixing grainy videos using the aforementioned video repair fixes is easy and quick, prevention is always better. Here are some tips to avoid grainy footage while shooting:
- Proper Lighting: Always make sure that your subject is well-lit. Good lighting will help keep your ISO as low as possible.
- Low ISO Settings: Keep your ISO between 100-800 for the best results.
- Use a Tripod: Stabilise your camera for clearer shots in low light.
- Properly Configure Camera Settings: Make sure you are shooting with a high enough bitrate and resolution.
- Shoot in RAW (if available): RAW video retains more details for editing.
Conclusion
Having a grainy video file can be distressing, but it can be easily fixed on your PC without losing quality.
If you are a professional expert, then tools like Premiere Pro, After Effects, or DaVinci Resolve can help you in repairing grainy videos.
However, if you are looking for an easy and simple approach, third-party video repair software like Stellar Repair for Video can deliver outstanding results with minimal effort.
Remember, the best solution is always to prevent grain during recording by ensuring proper lighting and using the right settings.
However, if you already have noisy footage, applying the aforementioned methods will help you restore clarity and make your videos look professional again.